
The Operating System.

The Operating System.
A new-hire field guide.
Twelve chapters. Real screenshots and guided review frames. Every click is shown twice, before and after, so you can see exactly what changes on screen. Press the right arrow to begin.

Your left rail.
A quick walk from top to bottom, so every screen has a name and a job before the workday starts.
Start with the rail.
This is the left rail. Every screen you will use is on it. Two minutes, top to bottom, so nothing here surprises you Monday.
Dashboard is the day's numbers.
Dashboard is the day's numbers. New leads, returns by stage, what is stalled. You glance at it. Chapter 2 shows the 7:45 brief that reads it for you.
Conversations is the morning list.
Conversations is every text, email and call in one list. First screen you open every morning. Chapter 3 lives here.
Calendars is who is booked.
Calendars is who is booked and when. Check it before you call a client back, so you know if they are already booked.
Contacts is the client record.
Contacts is the client record. Tags, documents, checklist, one card. When a client calls, look here first. Chapters 4 and 5.
Opportunities is the pipeline board.
Opportunities is the pipeline board. Every return is a card. The column is where it sits today. You move cards as returns move. Cards also move on their own when the workflows fire. Chapters 6 through 9 cover all of it.
Payments is the invoicing option.
Payments is where you set up your own invoicing and take card payments. The option is here for you. We will train on it separately when you are ready.
Marketing is the campaigns option.
Marketing is campaigns, email blasts and social posting. The option is here. A deeper trainer on it comes later.
Sites is the portal and website.
Sites is the portal and the website. AI360 handles it.
Memberships is where this training lives.
Memberships is where this training lives.
Media Storage keeps reusable files.
Media Storage is where you keep logos, letters and files the system sends out. You can upload here anytime. Drop a file in, it is ready to attach.
Reputation is review requests.
Reputation is review requests and what came back. You only come here when a client asks about a review link.
Reporting is the firm's numbers over time.
Reporting is the firm's numbers over time. Kristen reads it. You will not need it.
App Marketplace is for add-ons.
App Marketplace is add-ons for the system. AI three sixty handles it.
Settings is the account.
Settings is the account. AI360 handles it. If something looks wrong, tell Kristen. Do not change it.
That is the rail.
That is the rail. Six of these you use every day. The rest run for you. Back to Conversations. Chapter 3 starts there.

Conversations.
Every text, email, and voicemail a client sends lands in one inbox. This chapter is how you read it, reply to it, and leave a note the team can find later.
Open the inbox.
From any screen, click Conversations in the left sidebar. The Team inbox opens with the conversation list and the four filter tabs above it. The thread panel on the right waits empty until you pick one.
Unread is your daily driver. All is where things hide.
The tabs above the list are Unread, All, Recent, and Starred. Unread shows only what has not been read. All shows every thread for that search, read or not.
Recent is by activity. Starred is by you.
Recent orders threads by the latest activity, read or not. Starred shows only threads someone on the team flagged with the star. Both are search-aware, so a name typed in the search box filters them too.
The history is not just messages.
With a row open, the message history fills the center. Every stage move and every appointment shows up as its own line, with a date.
The channel is an icon. Open it before you type.
The small icon at the left of the reply box is the channel. Hover it and it says SMS. Click it and the list opens: SMS, WhatsApp, and Email. Internal Comment is its own tab, right beside it.
Type in the white box. White means the client will read it.
With SMS selected, the composer expands and shows From and To numbers plus a live character and segment count. Type the reply. The blue send button on the right sends it. This example is a draft only, nothing was sent.
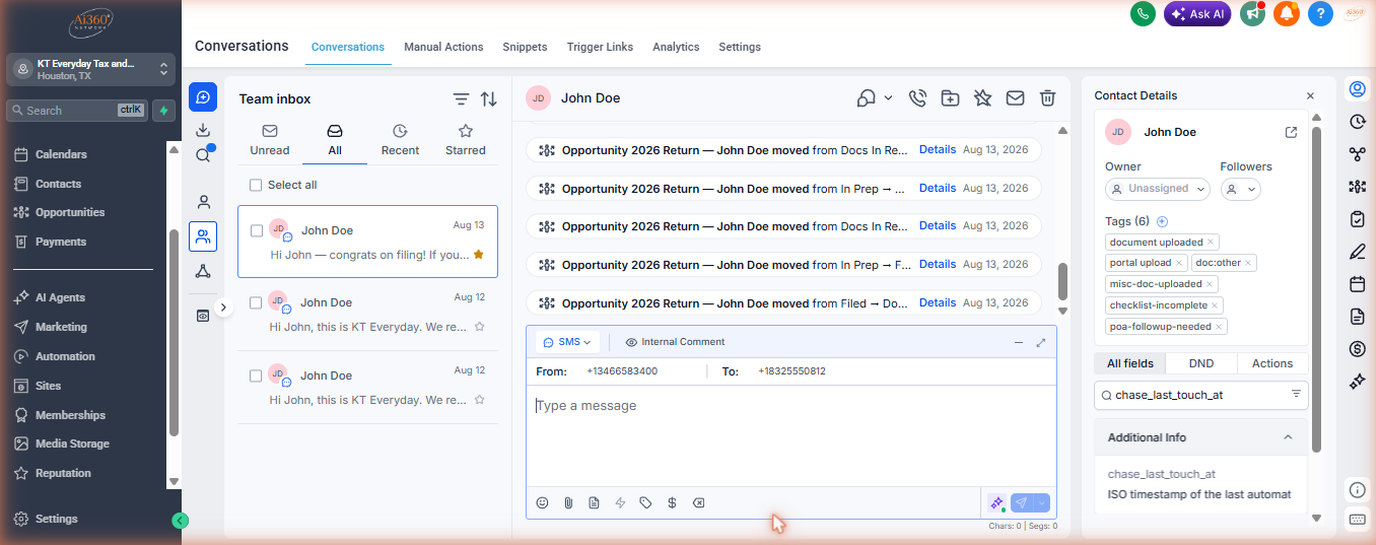
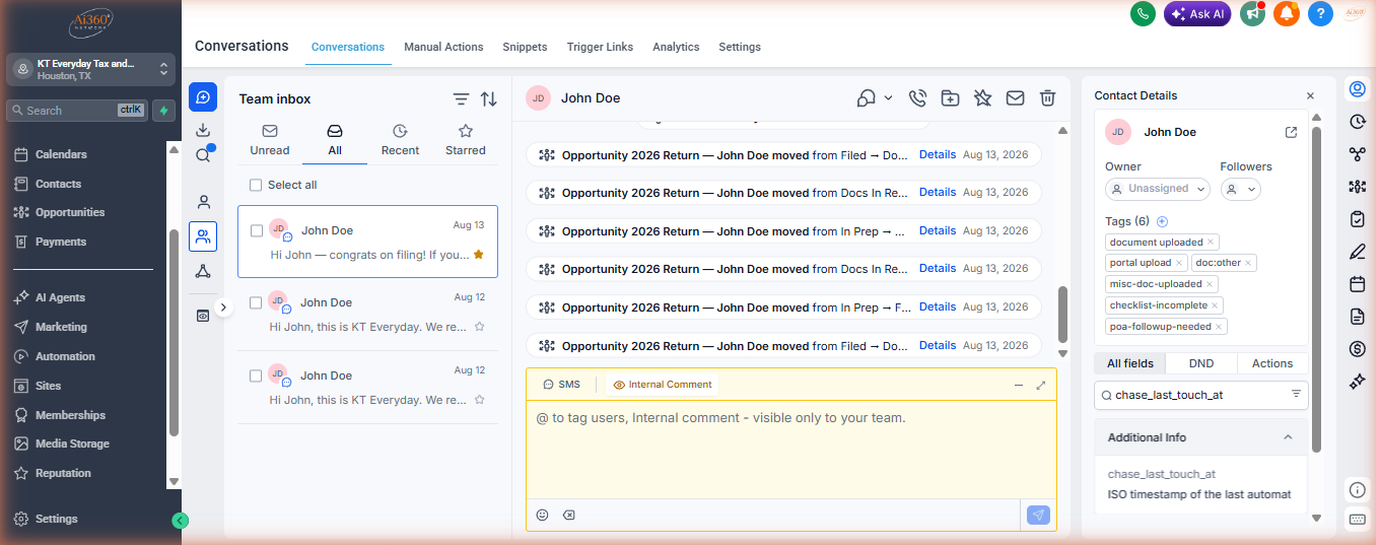
Yellow is safe. Only the team sees yellow.
Click Internal Comment beside SMS. The composer turns yellow. Anything typed here posts to the thread for the team and never reaches the client.
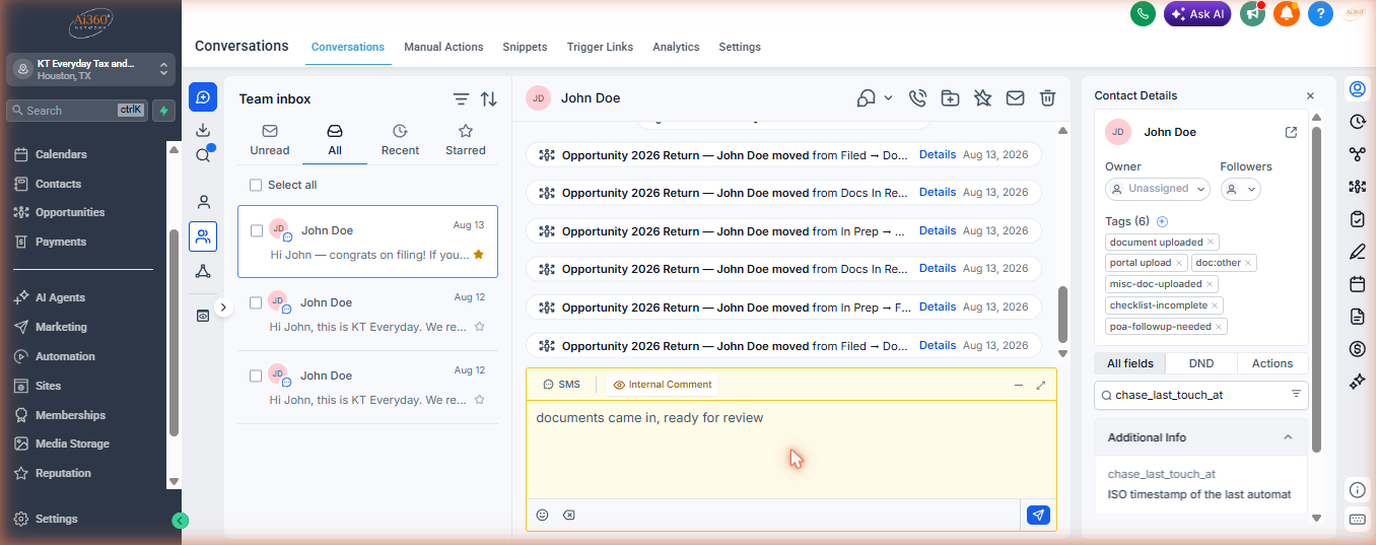
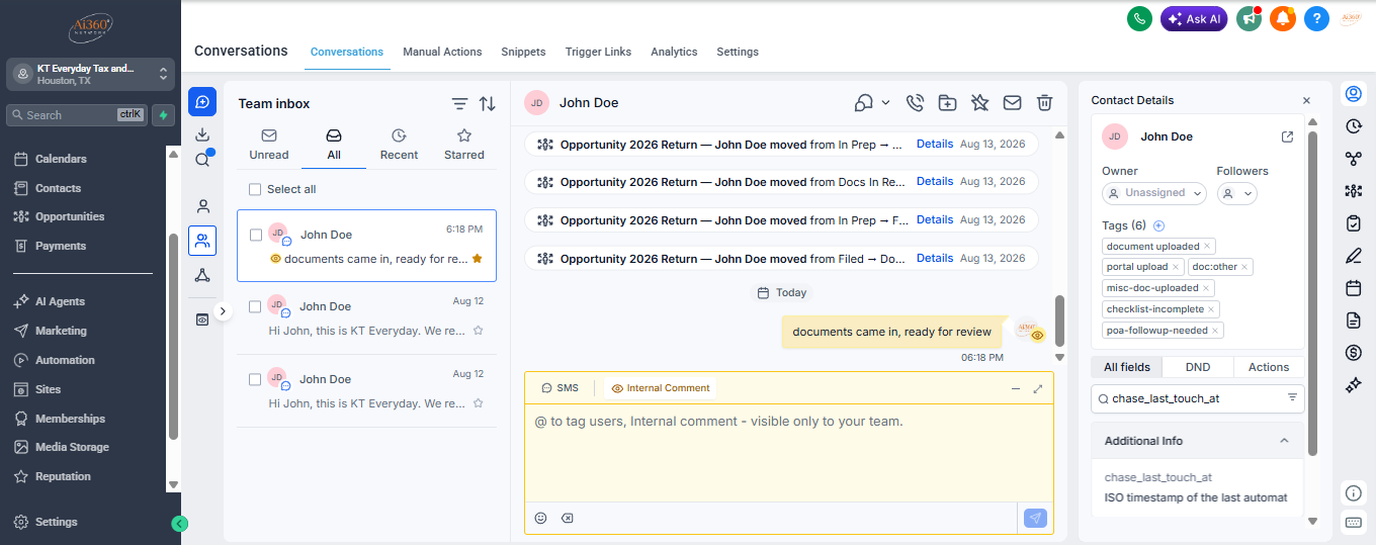
The note lands in the thread and in the inbox row.
Type the note and press send. It posts into the thread with a yellow background and a timestamp, and the inbox row updates to show it as the latest activity. Internal comments do not trigger any client-facing automation.
The side panels are icons. Hover to see the name.
The vertical rail at the far right opens a panel per icon: Activity, Opportunities, Tasks, Notes, Appointments, Documents, and more. The names appear on hover, not as labels.
Click Documents first. It says No documents yet.
Here is the one that catches everybody. When a client uploads through the portal, you would expect it to land under Documents. Click the Documents rail icon and see for yourself: the panel comes up empty, even right after a client submits through the portal.
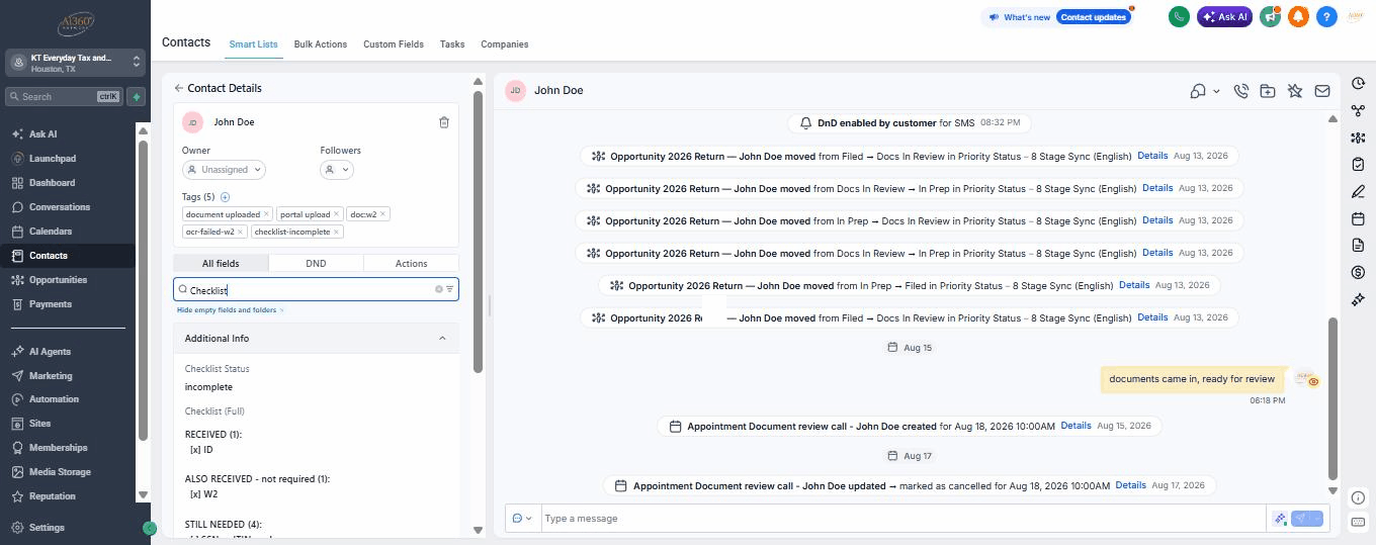
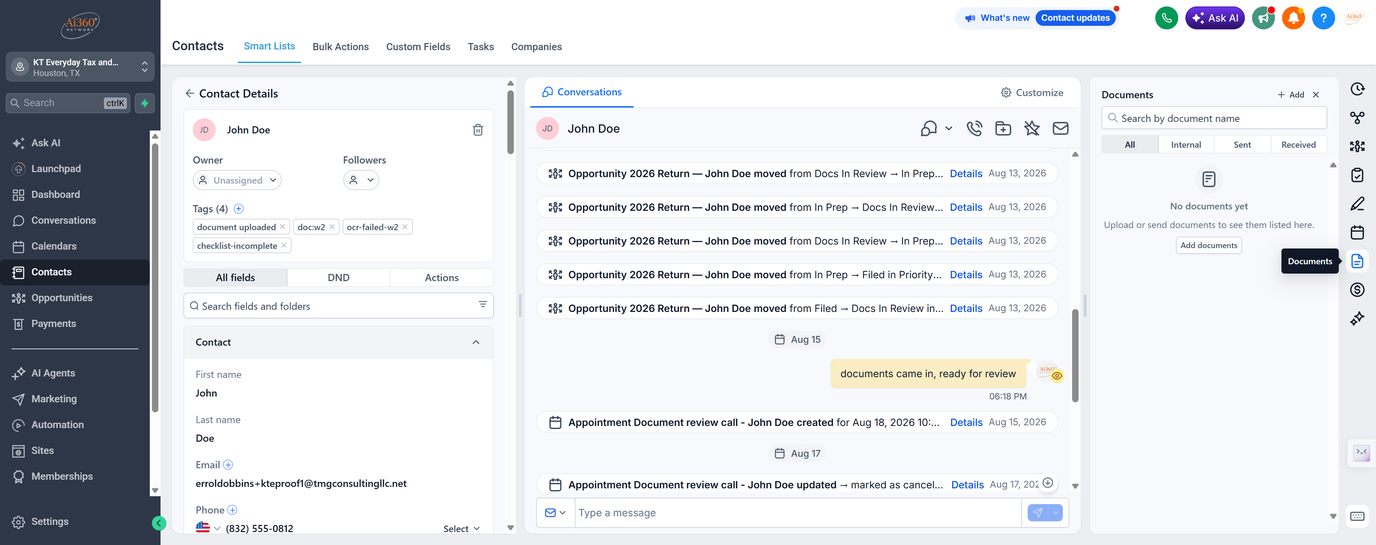
Now click Notes. There it is.
Click the Notes rail icon instead and the portal upload is sitting right there: a note listing each file with a permanent link. If anyone asks you did they send anything, open Notes first. Documents will tell you no, and Documents is wrong.
Where the file is.
Opportunities is the grid icon. Click it and the panel shows the open return, its pipeline, and the stage it sits in. Edit it from here without leaving the thread.
What is owed on it.
Tasks is the clipboard icon. Click it and you see what is due on this contact, each with a due date in your local time. Add, edit, or close them here.
Appointments show up here. Activity may not.
Appointments lists upcoming and past bookings with the calendar and status. Activity tracks page visits, form submissions, and calls, and it is often empty for a client who mostly texts.
Find the document icon first. Everything else follows from that.
Down in the reply toolbar, under the box you type in, there is a document icon. Click it and the snippet list opens right there. Search by name or scroll the folders, click the one you want, and the text drops into the reply where your cursor was.
Name it. Write it. Watch the phone.
Name is what you will search for later, so make it plain: Docs still needed. The body is the text itself. Use the tag icon to drop in a merge field like the client's first name, and the phone on the right shows exactly what they will read.
Save. It is in the list for everyone.
Click Save. The toast confirms it and the new row sits in the library with today's date. From now on it is one click away in every reply box, for every preparer, not just you.
Common mistakes.
- Replying in SMS when the client emailed. They get a text from a number they do not know.
- Typing a team note in the white box. The client reads it.
- Checking Documents for portal uploads. They are in Notes.
- Reading Unread as "everything." Switch to All before you tell a client nothing came in.
Conversations · Checklist.
- I can find Conversations in the sidebar from any screen.
- I can open a thread and read the contact card on the right.
- I can open the channel list and pick SMS, WhatsApp, or Email to match the client.
- I know that yellow = internal-only, white = client-facing.
- I can post an Internal Comment that only the team sees.
- I know portal uploads land in Notes, not Documents.
- I can switch the inbox filter between Unread, All, Recent, and Starred.

Contacts.
Every person, whether a lead, current client, prospect, or family member, is a Contact. The list is the firm's address book. The detail page is where the full story lives.
Open the contacts list.
Click Contacts in the left sidebar. The contacts screen opens: every person on file, one row each, with their phone, email, when they were created, their last activity, and their tags.
Find someone fast.
Top right has Search Contacts. Type any part of a name, email, or phone. The list filters as you type.
Open the detail page.
Click the contact's name to open their full record. Three panels: Contact Details (left), conversation history (middle), Activity log (right).
Add a tag, pick existing.
Click the + next to "Tags." Start typing. The dropdown shows existing tags that match. Always pick from existing, don't create new ones unless Kristen says so.
Create a new contact.
Top right: + Add Contact. A side panel slides out with First name, Last name, Email, Phone, and a few channel options.
Fill it. Save it.
First name is required. For email and phone, enter at least one. Then click Save. They show up in the list and you can immediately open their detail page to add tags.
Describe who you want in one line.
Contacts opens on All, so click Filters at the top of the list. The drawer opens on the right and you build a rule: pick Tag, pick Is, pick checklist-incomplete. That is the whole rule. One condition answers most of the questions you will ask this system all season.
Apply narrows it. Add Smart List keeps it.
Hit Apply and the list drops to only the contacts that match. Then Add Smart List saves that rule as its own tab, sitting next to All, ready every morning without you rebuilding a thing.
Common mistakes.
- Creating a duplicate contact instead of searching first.
- Creating a new tag with a typo because you didn't pick from the list.
- Saving with email but no phone (or vice versa) on a person who clearly gave you both.
- Editing the contact's tags from the contact list view instead of the detail page. Sometimes the bulk-tag tool selects more than you meant.
Contacts · Checklist.
- I can open the Contacts smart list and read the columns.
- I use the Search Contacts box to find people, never scroll.
- I can open a contact's detail page and read all three panels.
- I can add an existing tag to a contact and I know never to create a new tag without permission.
- I can create a new contact from the + Add Contact button.
- I know which fields are required and what "Save and add another" does.

Pipelines & Opportunities.
The pipeline is the visible truth of where every client stands. Seven stages from New Lead to Done, plus Inactive for parking. Each card is one tax year for one client. Automation moves the cards. Staff never drag to Filed or Done.
Click Opportunities. The board opens.
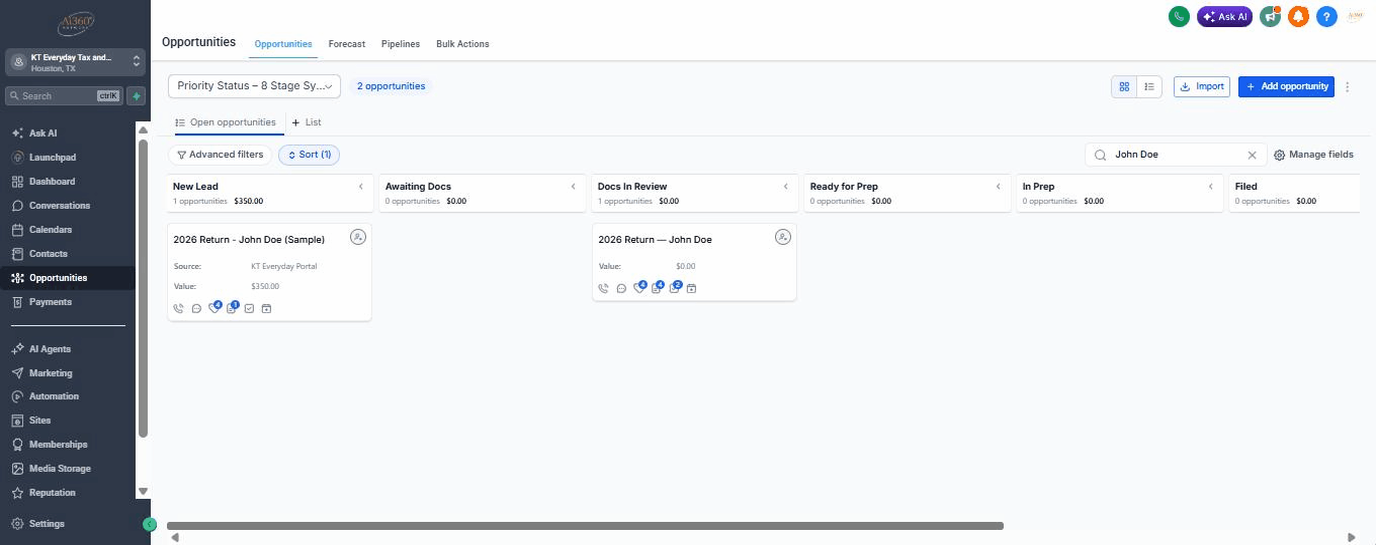
Opportunities in the left sidebar. Click it and the board opens: one column per stage, one card per client tax year. Read the stage names across the top. New Lead, Awaiting Docs, Docs In Review, Ready for Prep, In Prep, Filed, Done.
Click a card to open the return.
Click John Doe's card and the opportunity opens: contact details on top, then Opportunity name, the pipeline, and the Stage it sits in. Everything about this tax year lives here.
The stages, straight from the field.
Read the stages in order: New Lead, Awaiting Docs, Docs In Review, Ready for Prep, In Prep, Filed, Done. Inactive is a parking stage.
Switch to list view.
Top right, two small icons: board and list. Click the list icon and the same opportunities become a table you can sort: stage, value, created, updated.
Add an opportunity. Start here.
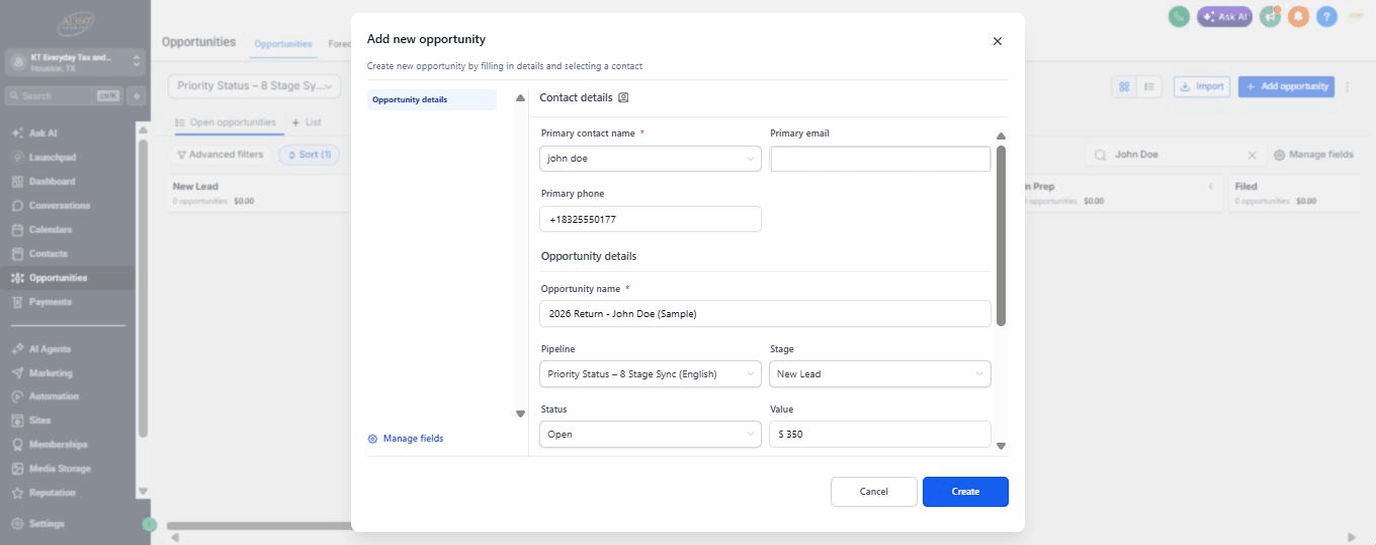
Top right: + Add opportunity. Click it and the form opens. Contact first, then the opportunity details underneath. The whole form fits on one screen.
Fill it out like this.
Pick the contact: John Doe. Then type the Opportunity name the way this firm names every return: the year, the word Return, then the client. 2026 Return, John Doe. Set the Value to the estimated fee, 350 here.
Hit Create. Watch it land.
Click Create. The card appears in New Lead with the name and the fee on its face. That card now moves itself as documents land, the way chapter 5 described.
Common mistakes.
- Dragging a card because a stage seems slow instead of checking whether the required event has happened.
- Using an opportunity name that does not follow the current naming convention.
- Changing Status when the issue is the work Stage. Status is open or closed; Stage is the in-flight position.
- Dragging a card to Filed or Done, or adding
filed-2025by hand. The 8879 send and the signature move the card.
Pipelines · Checklist.
- I can open the Opportunities board and read the stage headers.
- I can open an opportunity by clicking its card directly on the board.
- I can explain that Kristen's 8879 send moves a card to Filed and the signature moves it to Done, so nobody drags to Filed or Done.
- I can switch between the board and list views.
- I can create a new opportunity with the right naming convention.
- I know the difference between Stage (in-flight position) and Status (open/won/lost).

Tags → Automations.
Tags have a defined job in the current workflow. This chapter covers which tags staff apply, which tags the system writes, and how tags connect the record to its next action.
Every record wears its tags.
Open any contact and look under the name: the Tags row. John Doe wears four right now. Tags are how this system remembers what happened to a file without anyone writing a sentence.
Automation is one click away.
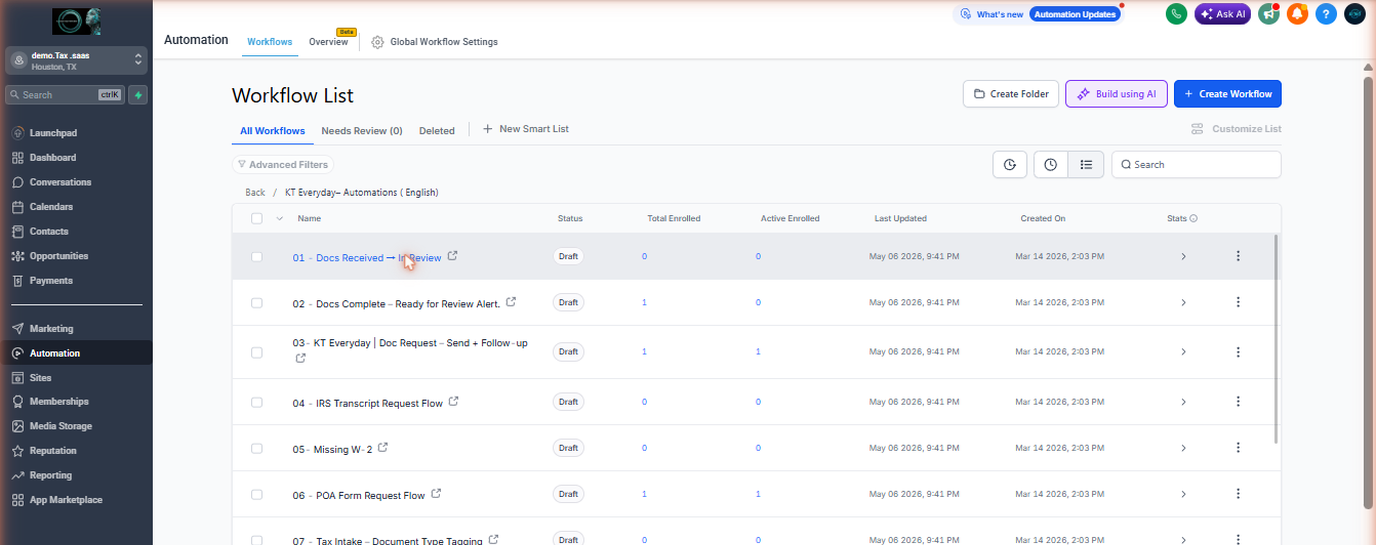
Every contact is one click from Automation in the sidebar. Click it, and every workflow in the account lists right here, by folder and by name, draft or published.
Add a tag from the list. Never type a new one.
Click the + next to Tags. Start typing and the picker shows every existing tag that matches. Pick from the list. The chip appears on the row the moment you click it.
The system writes most of these.
Look at John Doe's row again: document uploaded, doc:w2, ocr-failed-w2, checklist-incomplete. No person typed those. The system stamps them as events happen, and it stamps failures too, so a person knows to look.
Behind every tag, machinery.
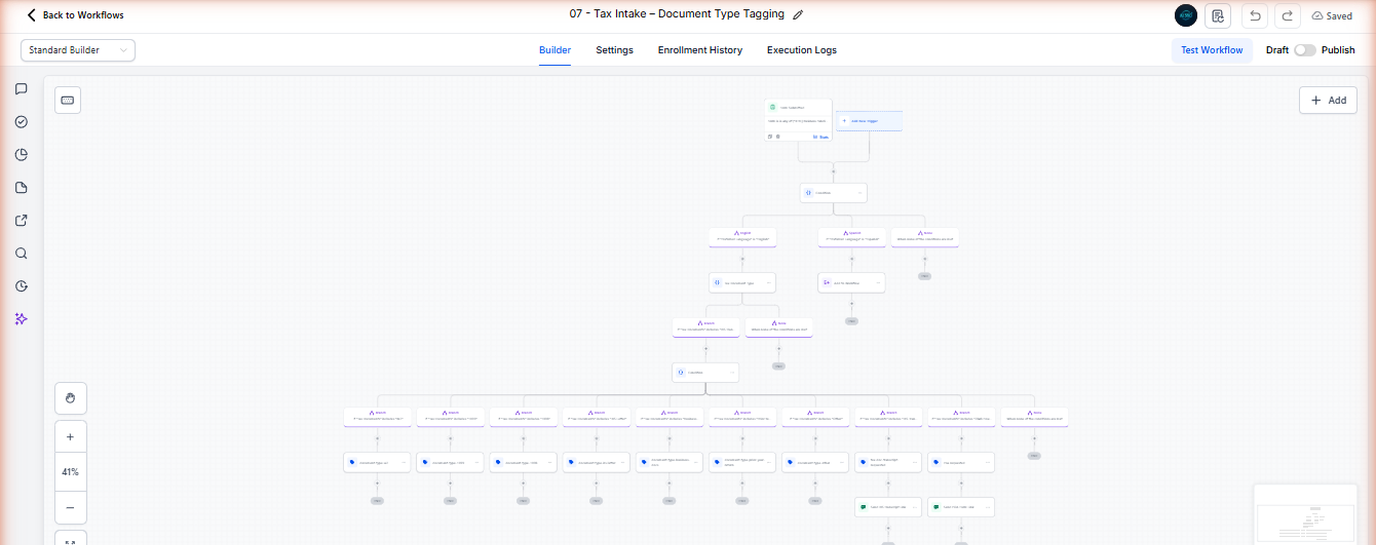
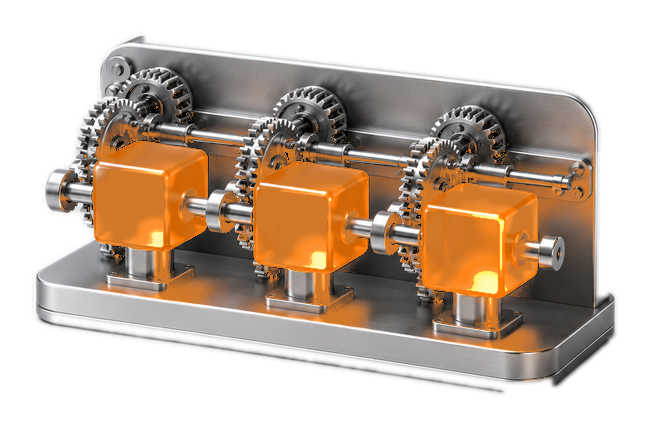
This is one of the automations, on purpose too far away to read. We have automations in place that run by these tags: a tag lands, a workflow wakes up, messages send, stages move, the checklist re-runs. You never open this screen; you just feed it clean tags.
The tags a preparer actually adds.
Staff apply only documented action tags. Use extension-2025 for the extension cohort and tax-doc-poa-requested when a POA request is sent. filed-2025 is automatic, and form-8879-signed is automatic or Kristen's to record for paper signatures. Event and status tags are written by the system.
checklist-incomplete is the bridge.
One tag matters more than all the rest: checklist-incomplete. Open any return that is still waiting on documents and it will be sitting right there. The checklist engine wrote it, the chase engine reads it, and Chapter Five is entirely about the machine behind it.
Common mistakes.
- Applying a tag without confirming it belongs to the current action.
- Using a tag that is not documented for this record or workflow.
- Typing a tag instead of selecting an existing tag from the list.
- Inventing a tag for a special case instead of escalating to Kristen.
Tags · Checklist.
- I can find the Tags row on a contact.
- I select an existing tag documented for the current action.
- I know
filed-2025andform-8879-signedare automatic or Kristen's, never mine. - I escalate instead of inventing a tag for a special case.

Document Checklist.
The checklist is the dispatcher. It decides what happens next, and you do not update it by hand.
The checklist keeps its own score.
Received on top, still needed underneath, with a timestamp. It fills itself from uploads. You never type in it.
Hide the empty fields before you read anything.
A contact carries dozens of fields and most are empty. Click the little funnel at the end of the field search box and pick Hide empty fields and folders. The panel collapses to only what actually has information.
Two versions of the same list.
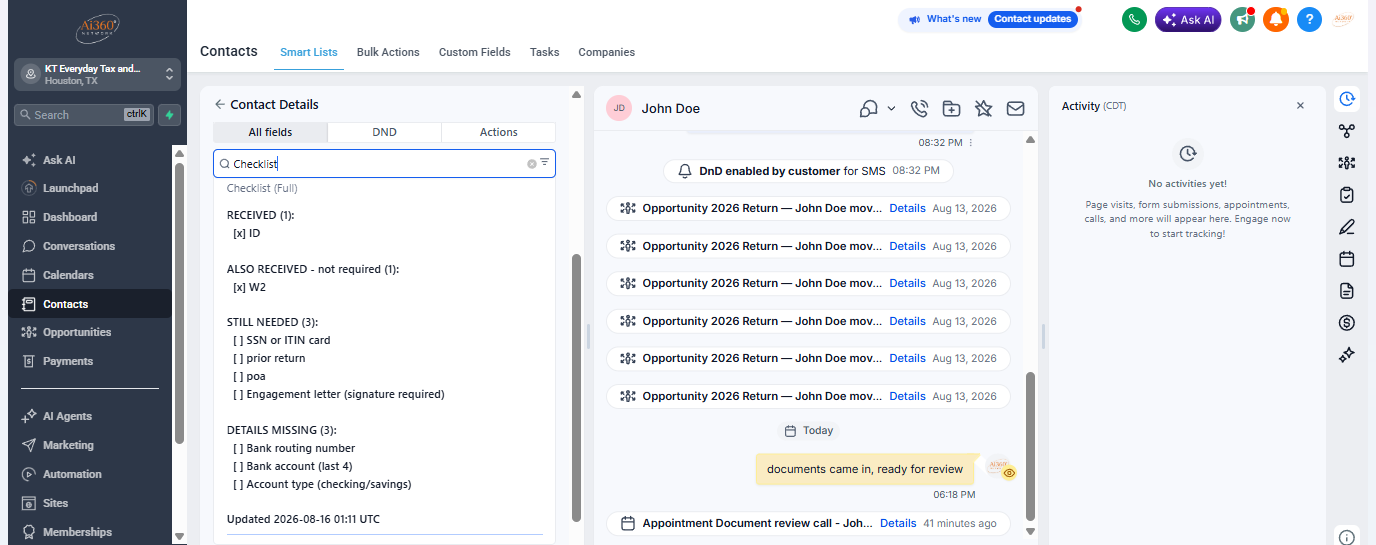
Search the fields for Missing Docs. Human is your shorthand: SSN or ITIN card, prior return, poa. Client Wording is what John Doe reads in the portal and in every chase text. Plain words, no field names.
The card is in your hand. Search the field, read the tick.
John Doe's SSN card came in by hand. Search the fields for SSN Card Received. Here it already reads yes, no unsaved changes waiting. That tick, made the moment the card came in, is the entire hand-off.
Save, then verify the recompute.
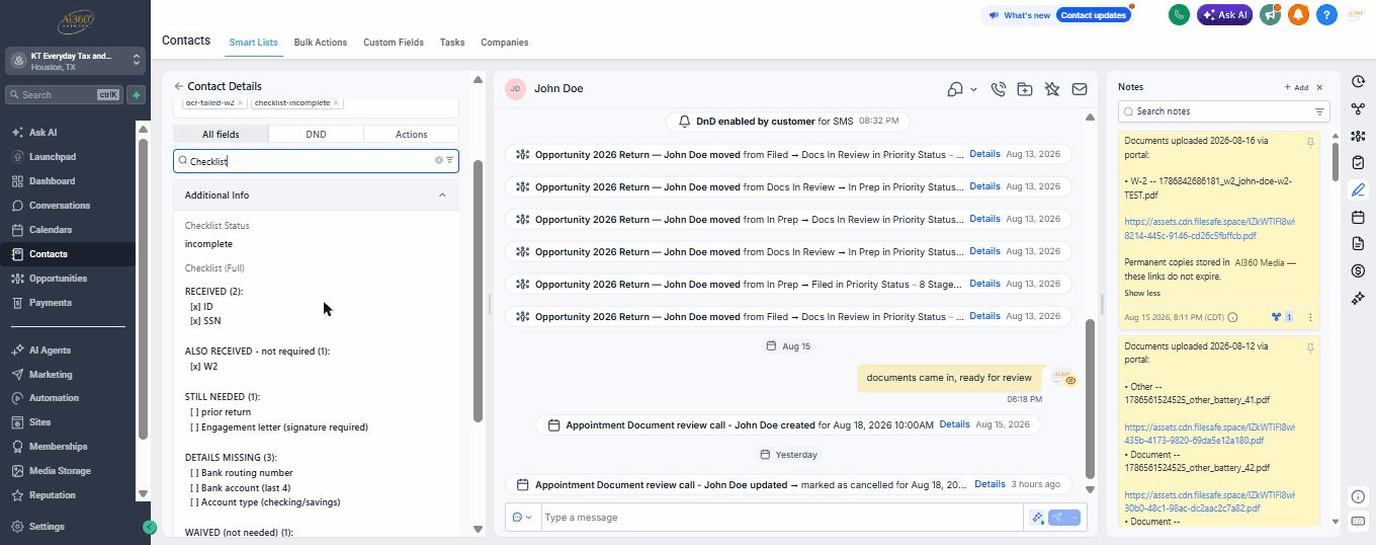
After you save, the checklist may take a few minutes to recompute. When it runs: SSN moves to RECEIVED, the still-needed list shrinks, the client wording rewrites itself, and the status and tags follow.
When a document should come off, waive it.
Sometimes the list asks for something this client will never have. You do not delete lines from the checklist. Search for Docs Not Needed (Waived), tick the document, Save. On the next engine pass it drops off the still-needed list and the chase engine stops asking for it.
The habit to build: don't touch it.
Checklist Status is computed from the documents received and the facts on the record. It reads complete or incomplete. When it changes, the board reflects the current file state; you do not hand-edit the summary or drag a card to make the checklist agree.
Common mistakes.
- Ticking the box twice because the summary did not repaint instantly. Give it a few minutes, then report a stale result.
- Typing into Checklist (Full) instead of ticking the document's received box.
- Deleting or hand-editing summary text instead of using Docs Not Needed (Waived).
- Reading an existing client's "missing" status as a data error; Chapter Ten covers why that happens.
- Dragging a card to Ready for Prep instead of letting the status move it.
Document Checklist · Checklist.
- I hide empty fields before reading any record.
- I can receive a walk-in document by ticking its received box and saving.
- I know the summary recomputes within a few minutes and I report a stale result.
- I can waive a document with Docs Not Needed (Waived) and say why in a comment.
- I never hand-edit Checklist (Full), ever.
MTPO Transfer Review.
Fill, inspect, and stop. Filing decisions stay with the preparer.
Open the extension.
In Chrome, click the puzzle piece, then AI360 Tax Fill. The popup asks for two things. The access key, one time, saved on this computer. Then the client's full SSN under Load a client, and Fetch from cloud pulls their data down. It is hashed on this computer and never stored in plain text.
Find the return.
Now find the return. On the left, open Returns, then Return List. Click into Filter by Any Value and type the client's last name. The list narrows as you type. Find their row and click the SSN number on the left. That opens the return. If MTPO asks about an unsaved AutoRecover version, answer No. Choose Yes only when you are returning to the same file and intentionally restoring its recovered work. Then you land on the Client Information Sheet.
Load the client, then run the safe sequence.
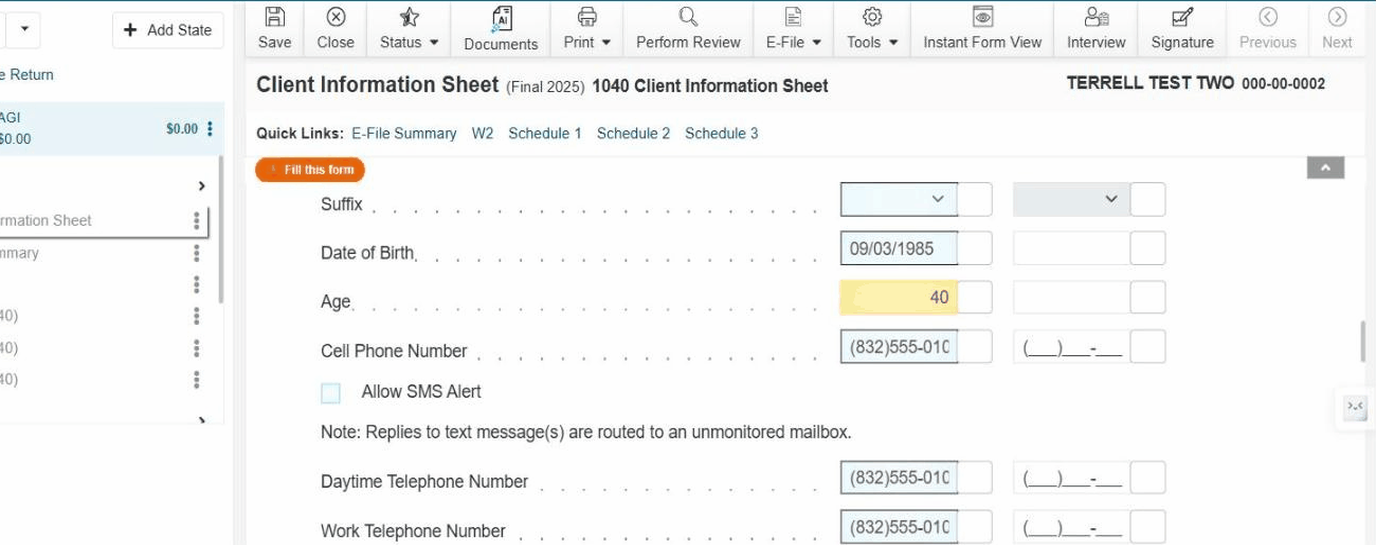
On the Client Information Sheet, the chip near the top of the sheet reads Load client first until it has a client loaded from the popup (Step 1). Once it does, that same chip reads Fill this form. Before you click: reload the extension, refresh MTPO, and answer AutoRecover No unless you are returning to the same file to restore its recovered work. Click it, and watch the sheet match the client name, then fill itself.
Read the fill report.
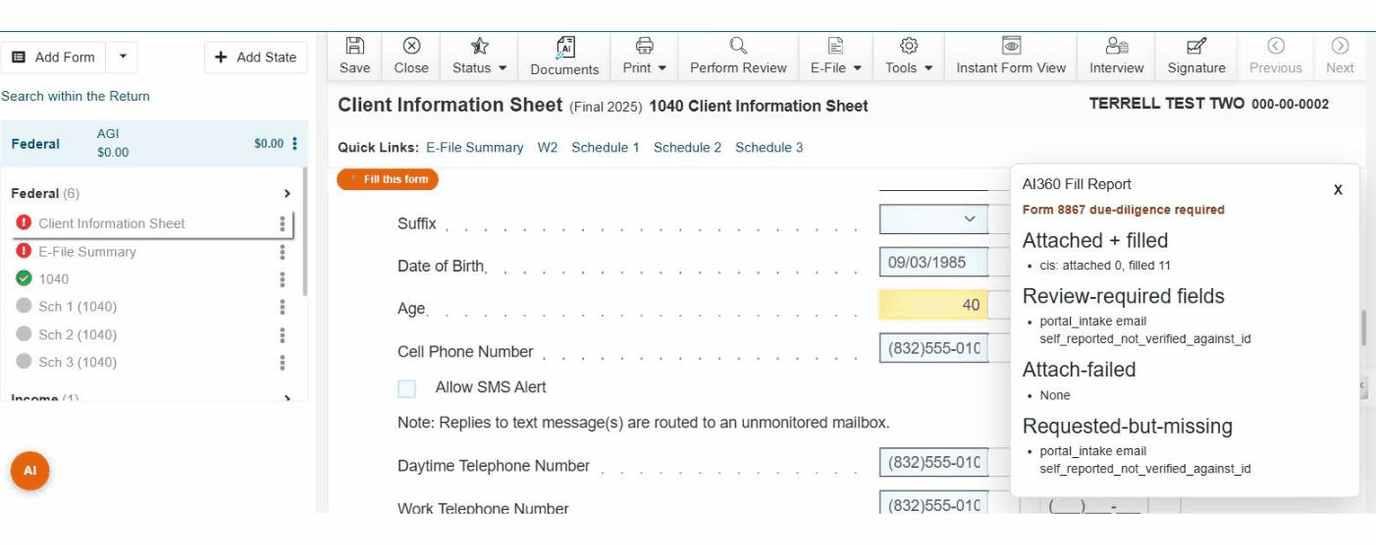
The AI360 Fill Report opens on the right when the fill finishes. It flags Form 8867 due-diligence required up top. Attached and filled reads the raw count. Review-required fields names the one line you check by hand every time: a self-reported value the system could not verify against an ID. Attach-failed and Requested-but-missing are separate lists below it. A blank is not automatically a failure; this report is how you tell the difference.
Watch the fill land on Date of Birth and Age.
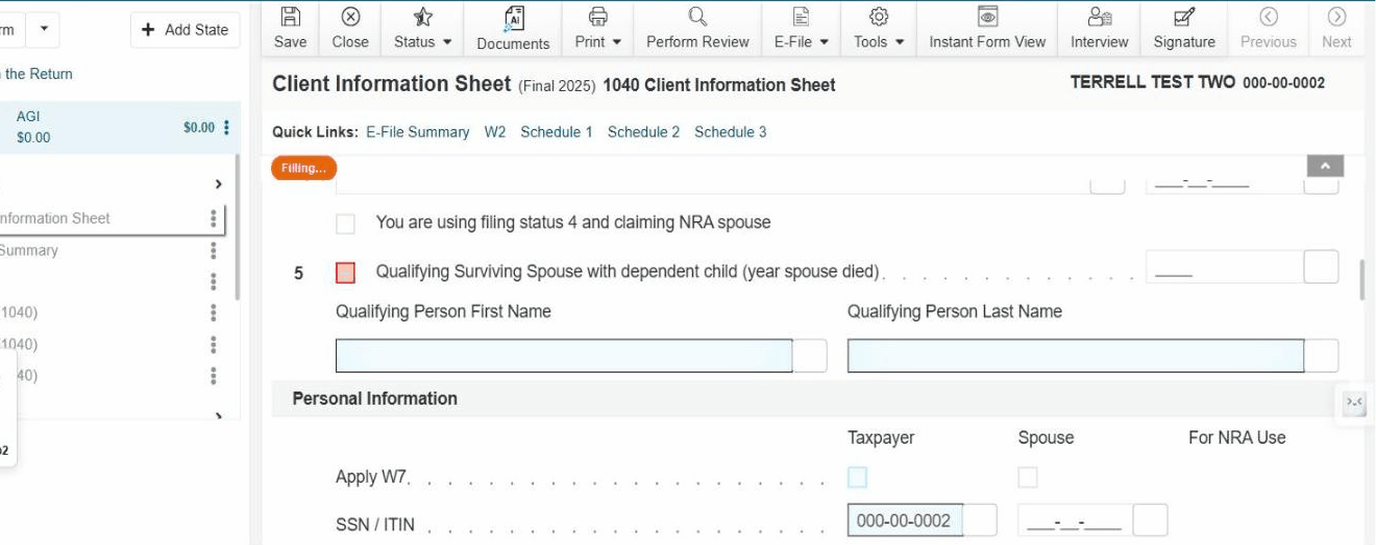
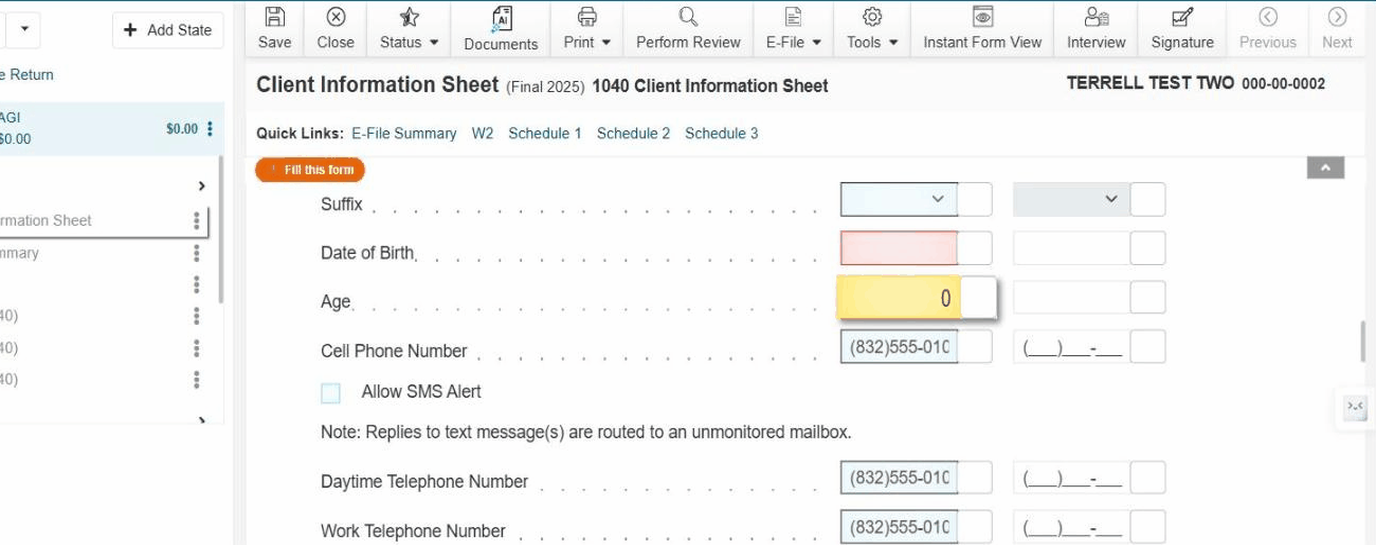
Name, SSN / ITIN, and phones were already on this test return before the fill ran. Date of Birth and Age are what AI360 Fill actually writes here from the payload -- watch them go from blank to populated, and check those two against the documents. This is a test return with a dummy SSN on purpose. Never screenshot, paste, or read a real one aloud.
Working a return, start to finish.
Six steps from the work queue to the handoff. Kristen handles transmission and the 8879. The board finishes itself.
1. Pull from Ready for Prep
That column is your work queue. Take the next client from it.
2. Open the return and click AI360 Fill
That click moves the card to In Prep. If you work without AI360 Fill, drag the card to In Prep when you pick it up and tell Kristen.
3. Prepare and review
Prepare and review the return.
4. Need more documents?
If you need more documents, use Rule Two. Chapter One covers it.
5. Add ready-to-transmit
Hand the ready return to Kristen. Your work on that return ends here.
6. Kristen finishes the filing path
Kristen transmits and sends the 8879. Filed moves on her send. Done moves on the signature. Thank-you and review messages go out at Done.
Common mistakes.
- Using a return with extra forms attached.
- Reloading the extension without refreshing MTPO.
- Answering AutoRecover Yes when you are not returning to the same file to restore its recovered work.
- Treating every blank as a failure.
- Working a return without clicking AI360 Fill, which strands the card in Ready for Prep.
MTPO Transfer · Checklist.
- I confirm the extension version and MTPO login.
- I answer AutoRecover No unless I am returning to the same file to restore its recovered work.
- I stop when the client names do not match.
- I review forms, key values, expected blanks, and the fill report.
- I add
ready-to-transmitand hand the ready return to Kristen. - I know my work on that return ends at the handoff.
- I explain that Kristen transmits and sends the 8879. Filed and Done move automatically.

Client Portal.
A real intake now, not a form. Go-forward path for new clients, not a fix for the current book.
What happens on upload.
John clicks Confirm in the portal and gets a submission ID. Nobody at the firm touches anything. By the time you open his record, OCR has already tried to read the file, Documents Received Date is stamped, the doc tag is on, the note lists what landed, and the checklist has already run.
ocr-failed-w2 so a person knows to check it by hand. One upload, one chain, pass or fail. If the opportunity does not exist yet, this same chain creates it in Docs In Review, named for the year and the client.Existing clients arrived a different way.
The current book came in by email, text, or in person, and got tagged by hand. Tags are history. The checklist only counts what its received boxes say. So an older file can carry a doc tag while the checklist still reads STILL NEEDED, until someone reconciles it. Search the fields for the document, here it is SSN Card Received. On John Doe that reconciliation is already done, the field already reads yes. That is the same move, Rule One in Chapter One.
Common mistakes.
- Treating a "missing vs. received" mismatch on an older client as broken software.
- Hand-editing a checklist to force a match instead of letting the upload feed it.
- Telling a client to re-send documents we already have on an older file.
- Forgetting that older files were tagged by hand and need reconciling, not chasing.
Client Portal · Checklist.
- I can name all three things that happen automatically on upload.
- I can explain why an older client's checklist and tags can disagree.
- I reconcile those older files by hand instead of chasing the client.
- I present the portal as the intake path for new clients.

Pipeline & Automation.
Automation moves files. Preparers communicate. If you're dragging a card, something upstream is broken.
Each stage has a defined owner.
A card is one tax year for one client. Open John Doe's record and read the history: Opportunity moved from Docs In Review to In Prep, dated, and no name attached, because no person put it there. Evidence moves the card. A document lands, the checklist recomputes, a tag changes, and the card steps forward.
The tags a preparer actually applies.
Pick them from the list, never type them. A tag you invent triggers nothing.
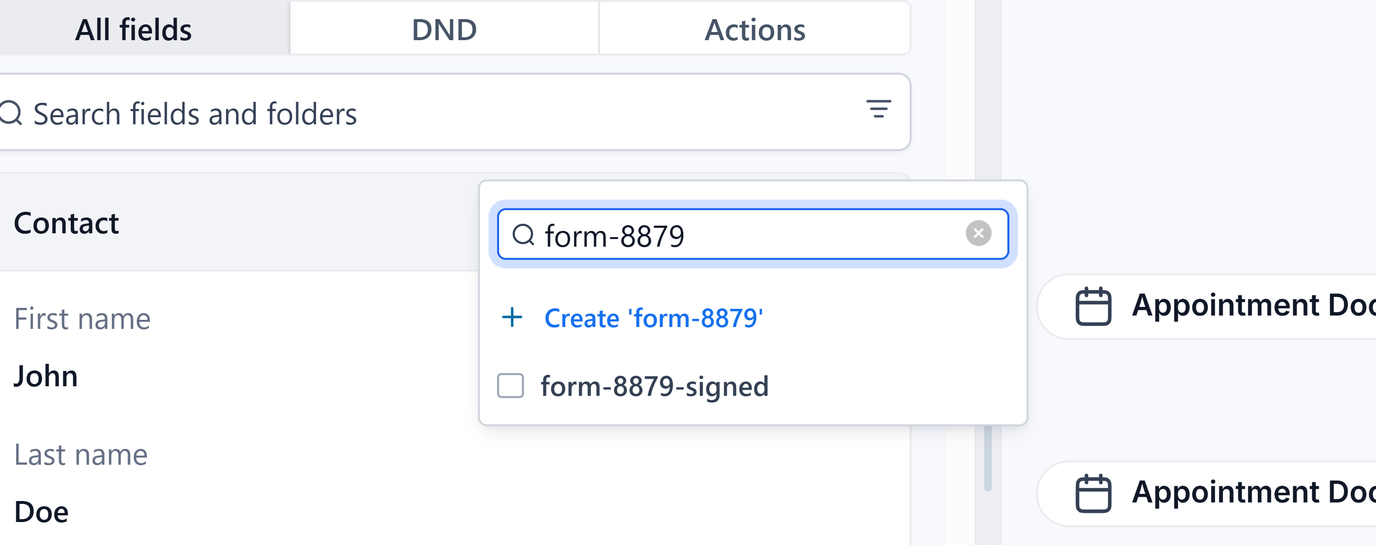
form-8879-signed or filed-2025. The first is automatic online or Kristen's for paper. The second is automatic when Kristen sends the 8879.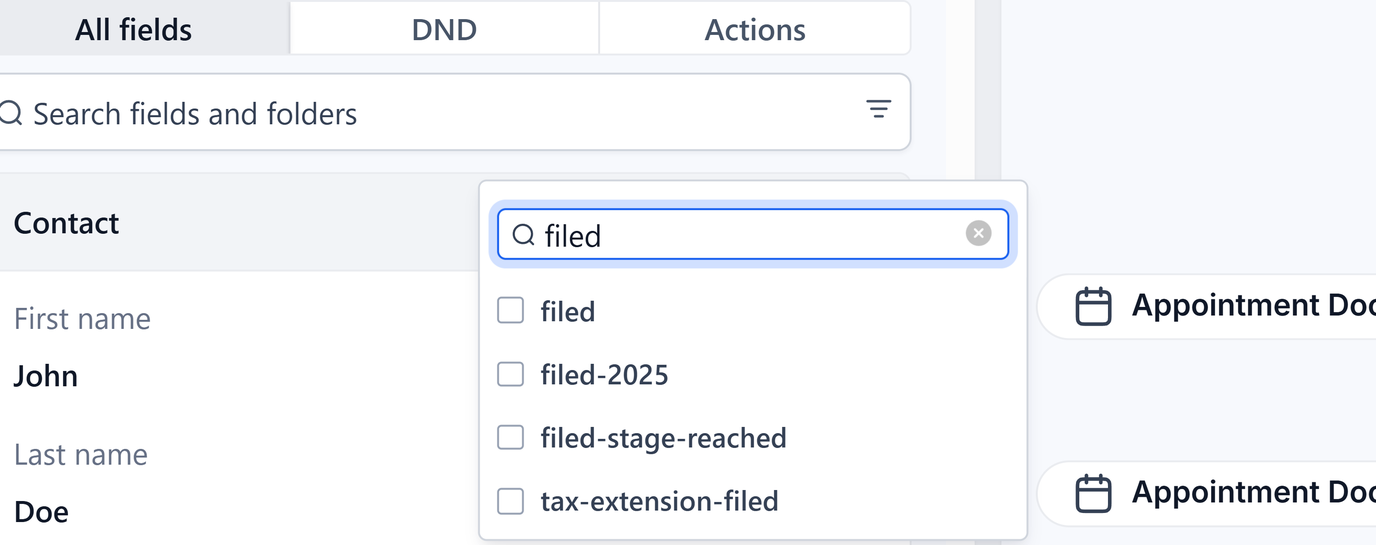
Common mistakes.
- Dragging a card because the stage seems slow instead of checking the required event or checklist state.
- Applying a tag without confirming it is the documented tag for that action.
- Working a return without clicking AI360 Fill; if that happens, the card stays in Ready for Prep until you record the manual In Prep move.
- Moving a card by hand without leaving an Internal Comment on why.
Pipeline & Automation · Checklist.
- I can name all seven stages in order, New Lead through Done.
- I know which stages are automation-owned and which are human-owned.
- I can name the documented action tag for the record I am working.
- I drag only for the documented no-Fill In Prep exception. Filed and Done move on their own.
The Chase Engine.
The assistant who waits its turn, follows up at most four times, then hands you the file.
It waits before it speaks.
Search the fields for Chase. John Doe's Chase State reads working and nothing has gone out yet. You just told him on the phone what you need, so the system holds: three days in season, six off season. When it does speak, the text names each missing document in his own words, with the upload link.
When it stays quiet on purpose.
Five cases where silence is correct. Search John Doe and open his record: two are on screen right now, a staff Internal Comment on his thread, and Chase Touch Count still empty while Chase State reads working, not stalled.
- Staff touched the file recently
- The record disagrees with itself
- No engagement on record
- Quiet, but not long enough yet
- Part of the existing book
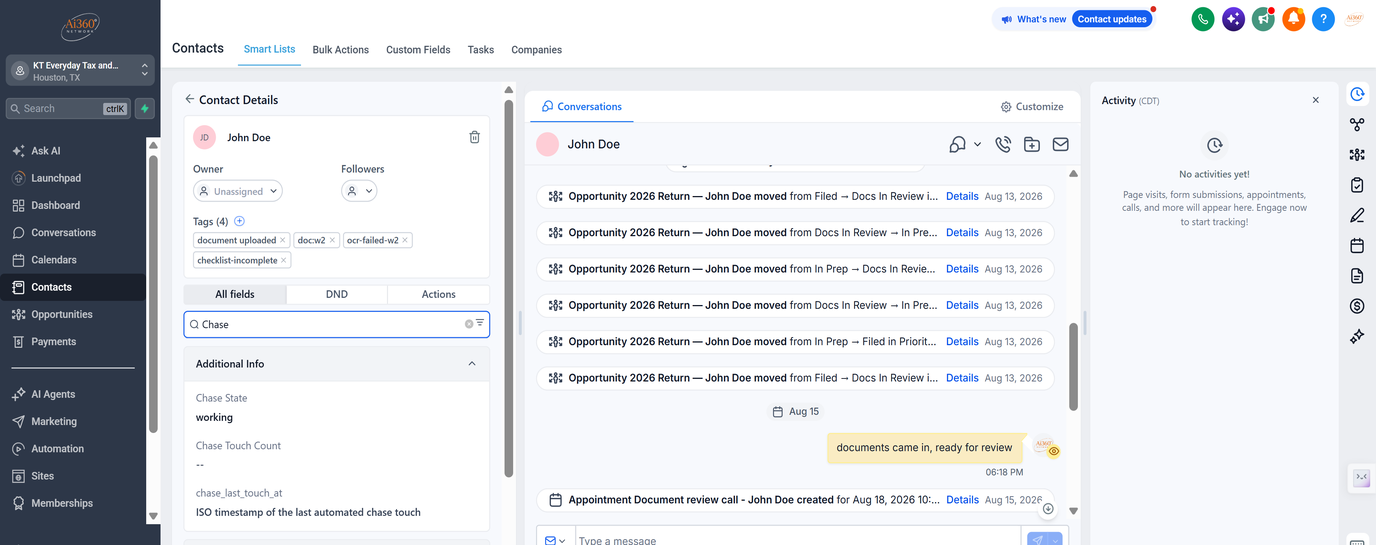
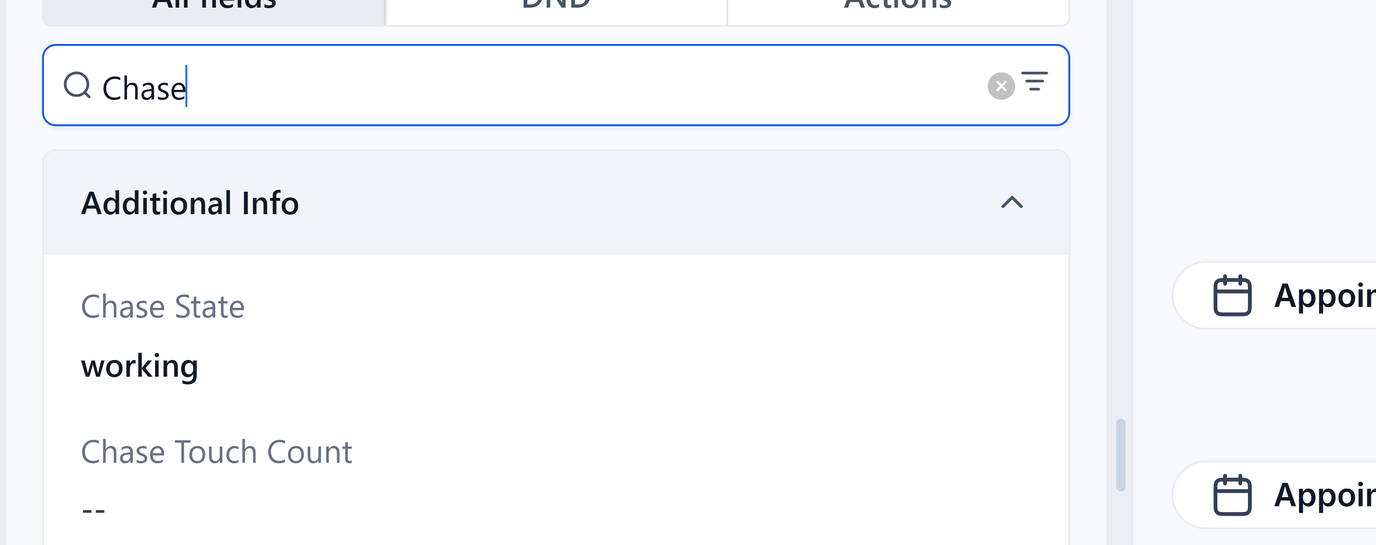
The evidence gate, the part worth explaining on camera.
Before the engine says a word to anybody, it asks one question: does the file actually show a client who has gone quiet on us. Most files that look quiet fail that question, and the engine stays shut.
Five states, one door
Every open file lands in conflict, verify-first, no-signal, stalled, or working. Only stalled opens the door. The other four are the engine deciding a message would be wrong.
The board is downstream of this
A card reaches Ready for Prep when the checklist evaluates as complete. Kristen's 8879 send moves it to Filed and adds filed-2025 automatically. The signature moves it to Done. Nothing on the board is an opinion. It is all evidence that already landed.
A stuck card is a missing document
When a card will not move, the answer is never to move it yourself. Something the file needs has not arrived, or arrived off portal and was never ticked. Find that, and the card goes on its own.
What people get wrong here.
- Reporting the engine as broken before walking the five quiet cases.
- Expecting a message the same day you called the client. The quiet period exists on purpose.
- Assuming a fifth message is coming. Four is the ceiling, then a human owns it.
- Forgetting that adding a document to an existing request restarts the quiet period.
Chase Engine · Checklist.
- I can explain the quiet period and why it exists.
- I can name at least three of the five situations where the engine stays quiet on purpose.
- I can explain the evidence gate and why only "stalled" fires a message.
- I know four messages is the ceiling, and that a human owns the file after that.

The Three Rules.
The board runs itself. These three habits are what keep it telling the truth.
If it did not come through the portal, the box still needs a tick.
Email, text, walk-in, paper, handed to you in the office. The system only sees what is in AI360 CPA. Search the fields for the document, here SSN Card Received. This file already carries that tick: the field reads yes, no unsaved changes waiting.
Additional Docs Requested, List.
On the contact, under Additional Info. Click into Additional Docs Requested (List) and the picker opens. Every document type the firm ever asks for is in this list. Tick the ones you asked the client for. That is what makes the request trackable.
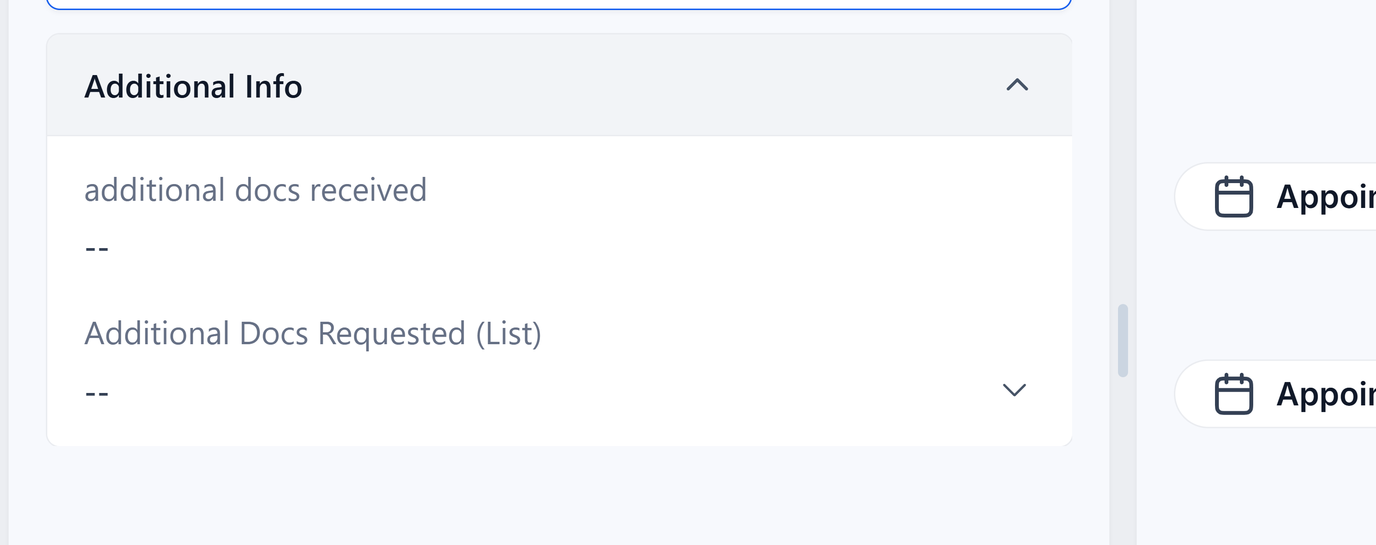
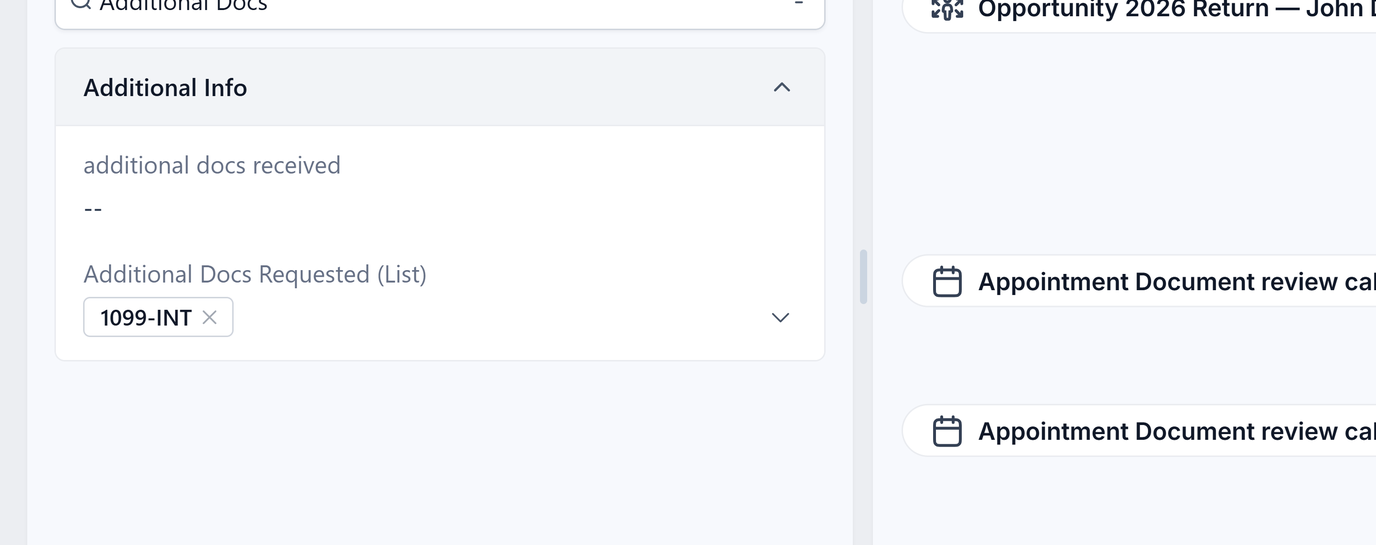
Scroll it. It is longer than the screen.
The picker holds the whole document vocabulary: the 1098 family, the schedules, prior year return, ID and SSN card, bank statement, childcare receipts, POA, IRS and ITIN letters, business entity docs, and Other. If you asked for it, it is here. Tick it here.
When a document does not apply, say so.
Sometimes a required document does not exist for this client. No prior return for a first-time filer, no POA because they never asked us to hold one. Do not leave it hanging on the checklist. Search the fields for Docs Not Needed (Waived), tick the document, Save.
Never assume the system is chasing someone you did not tick.
Same John Doe, after the checklist recomputes. The SSN card moved to RECEIVED, the POA fell off the list, and nobody typed a word in Checklist (Full). The system follows up on exactly this list. Not your notes, not your memory, not a past phone call.
What happens after you tick.
You handed the follow-up to the system and it runs in a fixed order. Quiet first. Then it reaches out, by email and by text, naming each missing document in the client's own words with the upload link. That is the same list you will see in Chapter Five, written for him, not for you.
What not to do. Part one.
- Do not drag cards backward on the board. Stage moves are forward only. A card in the wrong place is a signal, not something to quietly correct.
- Do not delete contacts or opportunities. Ask first, always. There is no version of this where deleting is the fast fix.
- Do not assume a verbal request is tracked. Tick the boxes. The conversation is not the record.
What not to do. Part two.
- Do not tick a received box for a document you have not actually seen. The checklist must reflect reality, not intentions.
- Do not drag a card to Filed or Done, and do not add
filed-2025orform-8879-signedby hand. Kristen's 8879 send moves the card to Filed. The signature moves it to Done.
You pass this chapter when:
- You can state all three rules from memory, in order.
- You tick the received box for anything that arrives off portal, every time, without being asked.
- You know that Additional Docs Requested is how a document request becomes real.
- You can name all five things never to do, and say why each one matters.
- You can finish this sentence: if it is not on the board, it is not in the system.
Day to Day.
Six screens you will open every day. None of them are new ideas. This is where you find them, what they are for, and the one habit each one needs.
The calls and texts only a person can make.
Conversations, then Manual Actions. When an automation reaches a step that needs a human voice or a human thumb, it lands here as a task with the contact, the workflow that asked for it, and who it is assigned to. Empty means the system has nothing waiting on you.
Write it once. Drop it into a hundred replies.
Conversations, then Snippets. This is the library you will live in day to day. Two exist today, Appointments and Services. New Snippet opens the same Add Text Snippet form from Chapter Three; that is still how a third one gets made.
Contacts opens on everybody. Filters is how you narrow it.
The All tab is every contact in the account, which is almost never the list you want. Filters sits at the top of that list and it is the only thing on this screen you need right now.
One list across every client. Due date or it does not surface.
Contacts, then Tasks is the location-wide list: All, Due today, Overdue, Upcoming. Filters can scope it to one contact. The same tasks appear on the contact record's Tasks panel, so a task made in either place shows in both.
Click Calendars. It opens on the week view.
Calendars in the sidebar opens on the week view. Every block on it is time someone owns, whether a client booked it or a preparer put it on the books for them.
Same bookings, a table instead of a grid.
Click Appointment list view and it opens on All, unfiltered: title, contact, status, time, which calendar it's on, who owns it. Row one is the exact booking the grid just showed, Terrell Test Tester on the 19th, now as a table row.
Search by title to find one booking fast.
Click into Search by title and type. The table narrows as you go, from every booking in the account down to the one you're after. Typing John Doe drops the list to his one call.
The same booking lives on the contact too.
Open the contact and click the Appointments rail icon. John Doe's Document review call sits under the Upcoming tab, its Cancelled status and the calendar it's on still showing, the same booking Calendars just showed. Made anywhere, it shows in both places.
Three steps. Info, document types, files.
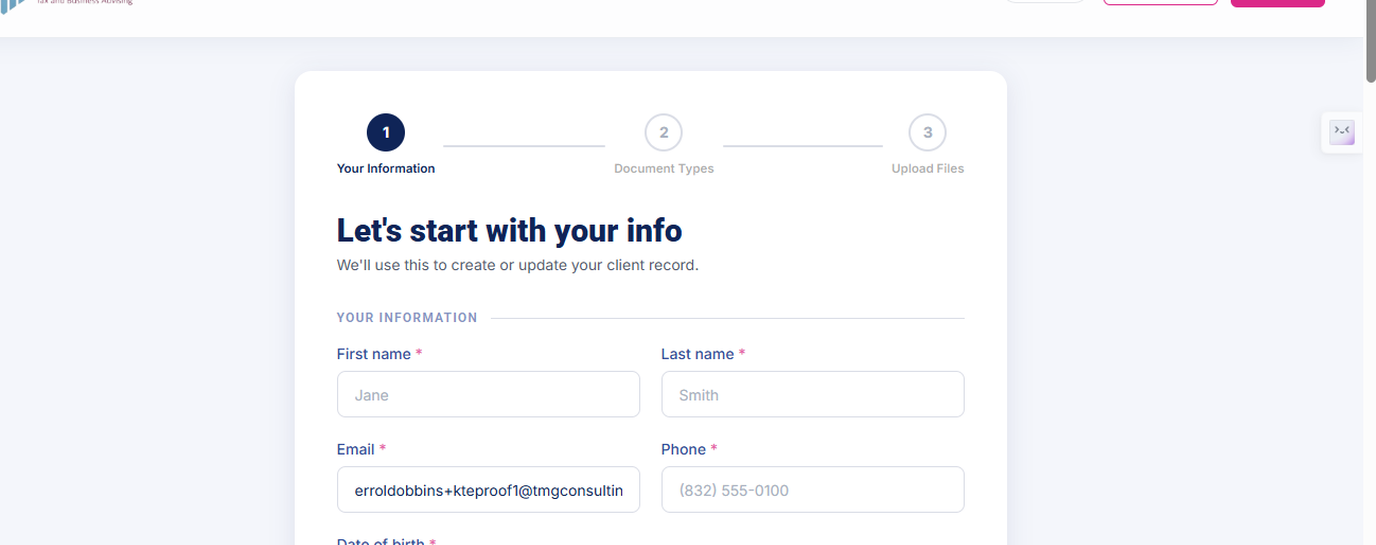
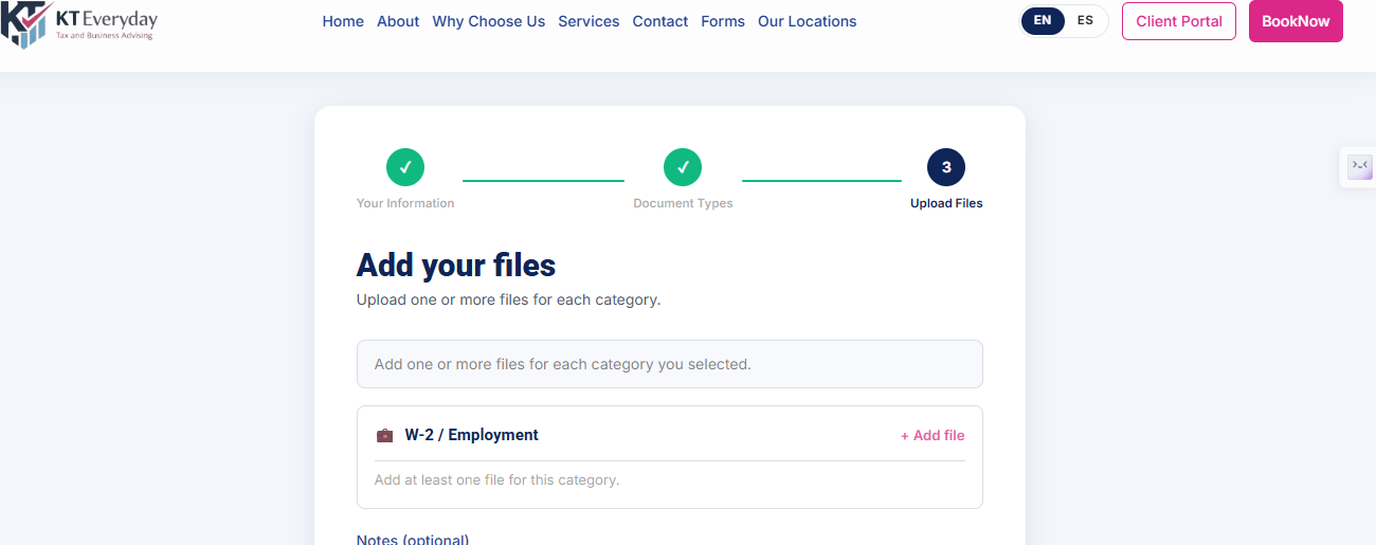
The client lands on a three-step wizard: Your Information, Document Types, Upload Files. They pick the categories they are sending, then attach one or more files to each category. Choosing direct deposit adds a Bank Statement tile to Step 2 automatically.
Documents Received. Now the system is working.
The file shows under its category with an optional note. Submit Documents returns a Documents Received screen with a submission ID and the line "Our system is checking what is still missing." That sentence is literal.
Click Documents. It reads No documents yet, on purpose.
Open John Doe's contact and click the Documents rail icon. The panel comes up empty every time, even right after a client submits through the portal. Documents is not where these files actually live.
Move to Notes. The files are sitting right there.
Click the Notes rail icon instead and the same upload shows up as its own note: the file name, and a permanent link to the copy held by AI360 Network. Those links do not expire.
The tags rewrote themselves while you were reading.
The system already retagged John Doe to the document type that arrived and recomputed his checklist behind the scenes. Read the tags first: an ocr-failed tag means the file came through but could not be read, so call the client for a clearer copy.
Common mistakes.
- Leaving Manual Actions unopened. The system already told the client someone would reach out.
- Retyping the same reply instead of making a snippet.
- Filtering the task list by typing in the search box. It does not filter. Use Filters, Associated Contacts.
- Screen-sharing Calendars with Manage view open. It shows the whole staff roster.
- Telling a client to check Documents for what they uploaded. It is in Notes.
You pass this chapter when:
- You open Manual Actions every day and know what an empty queue means.
- You can find, insert, and create a snippet.
- You can build a smart list filter on a tag and save it as a tab.
- You put a due date on every task and can filter the task list to one contact.
- You can talk a client through the three portal steps without seeing their screen.
- You know an upload lands in Notes and rewrites the tags, and what an ocr-failed tag means.

You're ready for the floor.
Twelve chapters complete: Your Left Rail, The Three Rules, Day to Day, Conversations, Contacts, Document Checklist, The Chase Engine, Tags & Automations, Pipelines & Opportunities, Pipeline & Automation, Client Portal, and MTPO Transfer Review. Questions go to Kristen.